Showing posts with label easy crafty ideas. Show all posts

Tuesday, February 1, 2011

safe(r) crayons


With a new one crawling I've been increasingly aware of choking hazards.  Some of these choking hazards were the little pieces of broken crayons that roll off the table from an older sister.  To take care of this I decided to make the crayons as chunky as possible.  There are a lot of nice detailed tutorials out there that show you how to make really cute nice crayons.  I just melted mine into a muffin tin.


I ripped off the paper (way harder than it looks, I ended up using a sharp knife), then broke them into small pieces (super satisfying).  After they were divided up into the different tins I put them into the oven at about 425 degrees for maybe 15 minutes.  They melt fast!  They get really bubbly too.

Watch them!  You don't want burning wax.


When cooled, I popped them out.  The tops weren't too cute (a little muddy), the bottoms are a nice playful color though.


And way harder to stuff into a mouth :)

My daughter has discovered that they are stackable.  
It's fun, and they are helping her to learn her colors.

-Becca

Thursday, December 23, 2010

Ornaments Galore!

Every year I like to make some ornaments that remind me of the kids.
This year we made silhouette ornaments, like these.  
(Jocelyn does a great job at blogging, btw.  Check out all her crafts! ;)


I did this project a little different than Jocelyn so here is my tutorial:

First I traced around some pictures of the kids with my Pages program.
I made all the silhouettes 2 inches high and printed them on black construction paper 
and cut them out.
Didn't know you can print on black construction paper, did you?
Ya, check these out.


I cut out some round pieces of THICK cardboard.
I nailed a hole at the top of each one.

I also chose some scrapbook paper and cut the paper the same size.  I punched a hole in the paper right at the place where I nailed a hole through the cardboard circles.

Then I mod podged the paper to the cardboard
(that part was pretty fun)


My son helped me glue his own silhouette to the ornament.  It was fun to help my son identify who was who in the silhouettes (we even had my dog's silhouette in the mix).


For detail, I added glitter glue to the edge of the ornament,

And then I slipped a hook through the hole and added a ribbon. 

It was fun and made a nice handmade ornament gift for the grandparents.


And remember that egg ornament my sister made?

Well, it turns out you can make the same ornament with colored pencils, too!
(I was struggling with the paint)


This ornament is for a special someone in the military ;)
note the flag in Santa's sack


And, unfortunately, I sent this one away before I took a finished picture of the product.
But that is a sketch of Santa standing next to a reindeer... and a penguin ;)

Happy Holidays everyone!

Love you, blog world!  
See you Christmas day with a picture of my gingerbread house!  
(if it doesn't collapse before then, anyway)

-CK


Wednesday, November 24, 2010

Christmas Egg Ornament tutorial


Ever since I was little I remember my mother painting Christmas eggs.  She painted them and gave them as gifts for people who meant a lot to her.  I always loved coming home from school and seeing what she had been working on.  Each egg was different, and each year it was fun to see what she would come up with.
This year I wanted to start this tradition myself.  I've written out a few of the steps I took so that you can attempt the project yourself if you feel so inclined (wink wink).


A few of the supplies you will need:

An egg
A needle
A few beads (imagine two beads in the following picture)
One or two of the little golden flowery topper thingies (you can find them in the jewelry section at a craft store)
Paint
Thread
And a toothpick might be of help to hold the egg while you are painting it (poke it through the bottom and hold it like a popsicle)


First, find a nice large egg.  Mine is a plain white chicken egg.  Wash the egg off with soap and water.  
This is very important.  Dirty eggs are gross.

Next you will be taking a needle and very carefully poking a hole in the center of the top of the egg, and the center of the bottom.  Work the needle around a bit as you break through the shell.  You might be surprised by how strong the egg is.


Make sure the holes aren't too small, because you will be blowing into the top hole and you need the insides of the egg to be able to blow out of the bottom.
But don't make the holes too big either, you will want to be able to cover them up pretty when you are finished.

The next part is probably the hardest.
Blow all of the insides out!
I tried to keep my holes quite small and therefore I had to use a lot of cheek muscles to force my air into that egg.  It might be helpful to poke the needle (or a toothpick) up in through the bottom hole every once in a while and stir it around, this breaks up the yolk.
Just make sure you are holding it over a bowl so you can catch the yolk and egg white.  Better yet, stand right over the frying pan!

Once your egg is blown out, you can take a rest while the inside dries out.
Next you get to decorate your egg.
I penciled in a light picture (pencil can erase off of an egg, just be very gentle, and try it out on a small area before you go and smudge too much), then painted over the top.  I used regular old acrylic craft paint.
The paint I used dried very fast.  So fast.  With every layer I made the paint built up and built up.  I went ahead and used this to my advantage by creating a very textured look (notice the wings).  But you don't have to do it that way.


Once you are finished painting your beautimous egg, you can go over it with a coat of either clear fingernail polish, or some varnish.  This not only makes your egg pretty and shiny, but it adds an extra later of strength.  Make sure to test it out on a small portion to make sure that your top coating won't make the colors run.


Next you will be covering up the holes and adding the string.  I used thread.  Loop the thread and string it in through the bead, then the nice gold topper.  Knot the thread at the end.
Tuck the knot into the hole on the top of the egg.  Super glue the little gold thingy over the hole (I used a hot glue gun), making sure to center it evenly on the top of the egg.  Then glue the bead onto the little gold topper.


Glue a nice big bead onto the bottom of your egg, covering the hole.

And there.  You are finished.


Enjoying a Meaningful Christmas this year?
How bout link up?

Photobucket

Monday, November 22, 2010

Make Your Own Rainbow Cake


In celebration of my little one's birthday I made her a bright and colorful rainbow cake.
I'll share with you a trick or two I used on this cake, you know, just in case you decide you want one for your birthday too.

First, I had to teach her what a rainbow was.  I wanted this thing to be appreciated after all.


Second, I made myself a cake tin.  I know this is totally unconventional, but it worked exactly the way I wanted it too.  First off, who wants to go by an expensive pre-shaped cake tin?  There are only so many times you are going to make the same cake, it just doesn't make sense.
Second off, this is cheaper.  (Sort of ties in with the first point.)
Third off, I know I could have made a nice big sheet cake and then cut the rainbow out, but then I would have a plethora of crumbs.  I hate crumbs.  This technique gives you nicely baked edges.
Fourth off, this is fun.  I've made big dinosaur-shaped cakes this way.  It opens a whole world of new cake shapes.


To make the tin I used plain old tin foil.  I would suggest heavy foil if you have it, but mine was normal/medium.  I do not suggest using cheap/thin foil.   I shaped the foil in a nice big casserole dish, you can use a large rectangular cake pan if that is what you have on hand.  I knew that I would have a lot of empty space in my dish so I placed small glass jars in there to fill them in.  This encourages the tin foil to keep its shape. 

I then shaped out the rainbow with clouds on the end.  Don't stress too much, frosting covers up the details.  You can see that my shape was too wide for the sheet of foil, so I added pieces on the bottom.  I didn't tape them down or anything, just molded it out.  As I've said, I've used this technique several times, and it always seems to work out.  Cake batter isn't super runny like water, so as long as it isn't on your counter for an hour with the batter seeping through the crevices, it shouldn't be a problem.

I then sprayed the tin with non-stick spray and poured in the batter.  Don't use all of the cake batter if this is not a large cake.  I made six cupcakes with my left over batter.
Stick it straight in the oven, the edges will start to cook right away and they won't seep through.


Tada!  
Once it's cooked you can pull it out of the oven and remove the glass jars.  Let the entire cake cool off before you remove the foil.  You can lift it right out of the dish, then peel off the foil.  
Be very careful not to break the cake.  Mine actually did break because I kept it covered all night before taking off the foil and it got too moist.  But I wasn't too worried about it because it was covered in frosting anyways.
If you want you can place it upside down on the serving platter before peeling it off.  That might help it from breaking.

Now the fun part.  Buy a nice big bag of mms and separate the colors.  
Realize that red food coloring must be expensive because there is a serious lack of red mms.  
Realize that blue and orange food coloring must be easy to make.


Frost the cake with whatever kind of frosting you want.  If I were to do this again I would have bought pre-made white frosting, then given it a nice light blue color.  I made myself some cream cheese frosting because my husband loves it, but it turns out yellowy/off white, and I was afraid to color it.  

Stripe the rainbow with those mms, then you can use either white frosting or large marshmallows (cut in half) for the clouds.  I used marshmallows because as I said, my frosting wasn't white.

And last but not least, get carried away with photo-shop.


I look forward to making many fun kid's cakes with this technique.  Maybe next year my husband will relent and let me make him that dino cake.

So fun.

-Becka

Thursday, November 18, 2010

raggy bowl

Hey yall!

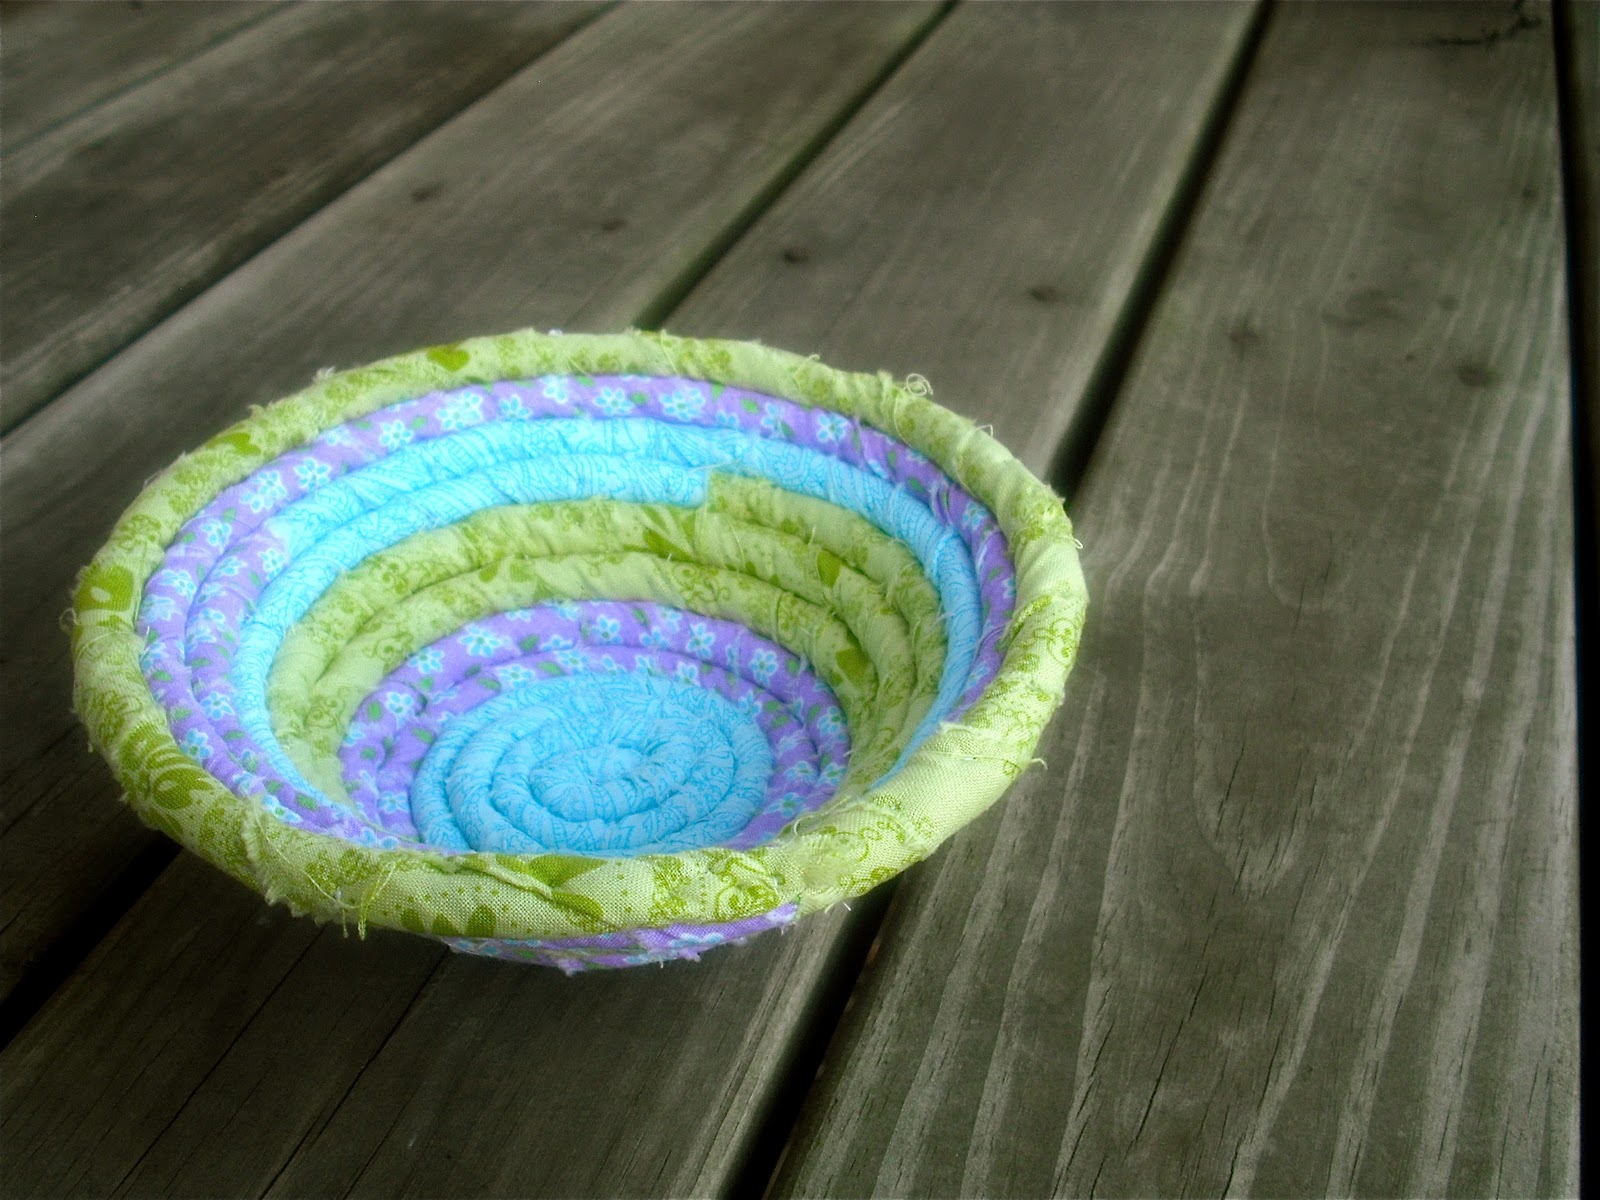
I found another tutorial that you might find fun.  Over at Wee Folk Art you can find the instructions for making a rag bowl.  The following is the one that I made.  They are surprisingly sturdy and strong.


I happen to know that the recipient of this bowl loves the colors purple and blue, I threw the green in for good measure.  While I found the tutorial very informative, here are some tips that I think could be of help if you embark on this swirly project yourself.


When it comes to crafts I am a cheater.  I absolutely could not afford to purchase the top of the line materials for every project I feel up to making, I just like to make too much.  So I completely cheated and ran across the street to my Home Depot and bought rope there.  I say cheated because I have absolutely no idea how much upholstery cording is, but I didn't really want to go out of my way to find out if I can find something else to substitute.  I bought some that looks like this.  Yup, the fabric covered all of those bright colors right up.  I can't remember if this was the exact same kind, but it was the definitely the longest (thickest) rope that I could afford.  Remember not to get anything too thin because that means a lot of coils for a decently sized bowl.  Use any rope you feel like, just make sure the core of the rope isn't made out of rubber or something that you can't sew through easily.

My second tip is to use a curved needle.  I didn't use one but I wish that I had.  It is easy to make your own curved needle.  Hold a needle on both ends with some pliers.  Say the magic words, "Hey yo needle I need you to curve, to make a bowl easier you will serve".  Ya just kidding.
That totally wouldn't work.
Hold the needle horizontally above a candle.  Slowly bend it with both of the pliers.  As the metal gets hot it should bend without too much trouble.  When you are finished you feel like superwoman for having bent metal with your own two hands.
The purpose of bending the needle becomes clear as you try to insert it through two rows of cording without going straight into the next row.  You also use curved needles on some types of hand-made books.  And on spherical quilts.

Tip three really isn't a tip, it's a confession.  I didn't make a little securing not after every stitch, they sort of got in the way for me.  I just held the rows tight as I went.  
I also didn't form mine around a bowl, hence the sort of flatter shape.

And my last tip is that if you use needle nose pliers it is so much easier to push the needle in and pull it out without your fingers getting sore.


So yeah, those are my tips.  
I honestly loved making this bowl.  It's an easy sit-in-your-rocker-and-craft-on-your-lap project.

-Becka
P.S.  Just be sure to keep it all tight as you go.


Wednesday, November 17, 2010

Buttercup Bag


(Sorry for the horrid picture, I was too lazy to find a nicer background.)

I wanted to share this amazing pattern with all of you.  I'm sure some of you have already seen it, or at least seen the beautiful bags that have been made from it, but for those of you who haven't, this post is for you! 

It's called the Buttercup Bag, and you can find the pattern for free at made by Rae.  Rae is an amazingly talented crafter who is kind enough to share many of the patterns she creates.  I would rate the difficulty of this purse at a 'simple' for those of you who have basic sewing down.  If I have enough time I can make a bag like this in one day (as in if I only have a few hours to sew), and each time I finish I think, "Wow, I should make more of these, that was so simple".

I definitely encourage you all to pick some pretty fabric and try out this pattern.  If you are a little intimidated, don't be.  It's a great opportunity to expand your sewing skills!

P.S.  To make mine a little more durable I used a thicker fabric and I added a layer of interfacing (is that what that stiff stuff is called?).  It made a huge difference.

-Becka

Thursday, October 7, 2010

cardboard box drawing


Boxes are easy to come by.


And usually, so are crayons.


So my friends, meet Mr. Thursday.


And the train with which he plays with,


and his pet dog, Fido.


... and this rain cloud.


Hour of ease, and an hour of fun :)

-Becka

Thursday, September 2, 2010

Yarn Doll Hair Tutorial


Howdy fellas!  As promised, here is a tutorial for sewing on yarn hair to a dolly.  Pig-tail style.  
When I began sewing dolls I searched online for tutorials on this very subject.  Let me tell you they were complicated.  I just didn't quite understood how they worked {something about using tissue paper and sewing the hair together by machine, before sewing it on by hand...}.  Well after several failed attempts that included tiny pieces of tissue paper left in the final product, I decided to just sew it in all by hand since that's what it called for in the end anyway.  

You should end up with this:


This is quite simple, and doesn't take long at all.  And of course you can change it up however ya want.  All right, let's start.

You will need yarn in the desired hair color, a needle and thread (same color as the yarn), a pencil, and a doll.


Cut up a bundle of yarn.  You will want enough so that the hair is thick.  You won't want the scalp to show through.  Try to make each piece about the same length.  You will be draping the yarn across the head over the center, so make them long pieces.


Draw a line with a pencil down the center of the head.  Start on the forehead and end above the neck in the back.  This is to guide your stitching so she ends up with a nice straight part.


I use a small clump of three strands of yarn for each stitch.  Find the center of the clump and place it on the line you have drawn on the forehead.


You will now take your needle and thread and sew a small loop around the yarn.  Make the stitch small. Pull it tight and then stitch a second loop around it again for security.  Take another bundle of three strands and double stitch it just behind the first.  
Continue this way all down the back of the head.


Stitch it all down tight.  Don't worry if you can see the thread down the center.  We will be hiding this.  


For the front of the hair we take a small bundle (more than three strands) of yarn and stitch it down on both sides of the forehead.  Stitch it right up there to be level with the part.


Make it nice and secure.


Now to cover the thread that shows along the part, take a strand from one side of the part and pull it on over to the other.  Alternate sides you are pulling from so that we keep an even amount of yarn on both sides of the head.  I think this gives the hair a bit of a natural look.


Find the point on the sides where you want the pig-tails to be tied down.  Comb the hair on that side with your fingers, then loop the thread around it several times.  Keep it tight.  I usually make a few loops, pull tight, make a few knots, and then do a few more loops and knots for security.


What happens if you get a stray strand tugged up above the loop?  Very carefully pull on the strand.  Don't pull it all the way out!  Watch the hair below the loop and find which strand is being pulled.  Tug it back down into place :)


Now this is the fun part.  Give your doll a haircut.  Trim her pig-tails up nice and even.


Feel bad for the yarn you are wasting.


And ta da!  you have a beautiful little hair do.  I hope you try mixing things up your own way.  Make the hair long.  Short.  Braid it.  Bundle it.  Tie a ribbon round it.  Make it yours!


-Becka


LinkWithin

Related Posts with Thumbnails