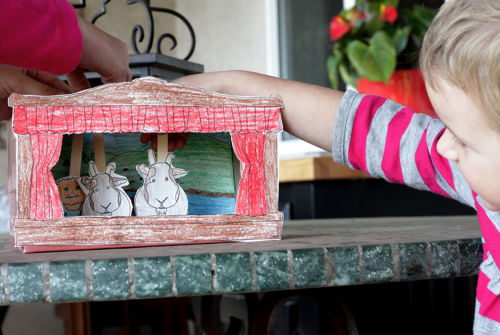
Sunday, February 27, 2011

hello


How's life for ya?

I just thought I'd ask.

I've started trying something new.  Something to do with the above picture; I've started making jewelry.
Okay, well, it only sort of has to do with the above picture.  I would never dream of making jewelry out of these plastic beads... not that they aren't beautiful.  They just belong to someone else.  
Someone very short and stubby.  
Someone who learned at a very young age how to overuse the word "mine". 
Which brings me to the question,
"Where did she learn to use that word?"

It's a total conundrum for me because you would think that a child who hangs out all day with her momma would catch on to words that her mother actually uses.
Do I walk around pointing at things and saying, "mine"?
Some serious self evaluation will have to take place after I finish this post.

No, I would never dream of using your beads, little girl.
You use yours.
I'll use mine.

-Becca

Tuesday, February 22, 2011

Free Printable and Haiti Book Update

First of all, I'd like to announce a guest post at IS-LY and free printable for our "green" bedtime-tales puppet stage made out of cardstock and a recycled kleenex box.  Check it out and while you are there give a congrats to my good friend, Melissa, and her new baby!


And now for an update on the Haiti Book:

I made my first doll ever!  Here is my son helping me stuff the limbs of the doll:


After making this doll I have even more respect for my sister and all the handmade toys she makes!  Making stuffed toys is such a multi-stepped process!

Here is our "Market Scene" illustration for the book.  It reads, "I love to go to the market"


I also edited and tweaked the "Smiles" illustration a bit, changing the colors and some of the material options.

It reads, ""smiles brighten up my day." 

So, let me know what you think!  I'm all up for suggestions ;)

-CK

Friday, February 18, 2011

Young Adelaides


So guess what?!  My sewing machine is working again!
I'll bet you didn't even know it needed fixing.  Yup, it was out of order for a few months there.  I finally got some professional help and it turns out that there was just a few too many dust particles floating around in there.  I try hard to keep a clean machine but I guess I wasn't keeping it clean enough :)
Anyways, these two dolls are one of the first things I finished up once I had a working machine.  You may remember my Adelaide dolls?  Well these are similar to the Adelaide dolls, only smaller.

Younger at heart :)
See?  They got blush on their cheeks.
Those lively, flirtin' sisters.


These two dolls took me over six months to make (talk about a slow production time).  I started them for the two daughters of a dear friend of mine when I learned she was moving away... well they've moved, I'll have to send them to her now.  


These are probably the last two Adelaide dolls I will make for a while, but I always like how they turn out.

-Becca

Thursday, February 17, 2011

S'more Pie


If you've been reading this blog for a while, you'll know that I like s'mores.  S'mores and chocolate.
I like s'mores.
And chocolate.

Okay.  Now that I have said that several times under my breath just to calm my fluttering heart, I'd like to introduce you to a wonderful wonderful recipe:
I found this recipe one day while reading The Pioneer Woman (I really like that blog).  This recipe isn't actually one of The Pioneer Woman's, but she links to it.  It comes from The Noshery.

Oh boy, this is a grand pie.
Go and take a look.  Please?!  Pretty Please?
Just go and look at the pictures.  They are pretty, and the recipe is simple.  
Did you go look?  Did you see that one picture with the chocolate filling drowning in toasted almonds and chocolate chips?  This is no regular pudding pie!  This thing has crunch!
I actually made this pie back in November, that is when the picture above was taken, and oh my, I think I will need to make another.

On a related note, I'd like to say that I made a cheesecake last week.  Yup, my very first cheesecake.  I had no idea those things are so dang expensive to make.  No wonder they cost so much at restaurants.  First off, this thing called for 5 packets of cream cheese.  5.  Ok, just in case you are wondering while you are sitting there licking the crumbs from the very last slice, How many packets of cream cheese did you just eat?  5.
And it calls for 6 eggs.  6!  I had no idea cheesecakes were made out of half a dozen eggs and a shell.  Okay, not the shell, I dug it out with my fingers, don't put egg shell in your cheesecake.  That would add a very very bad crunch.  Add it all together and throw in a few more ingredients and you have a whole lot of cheesecake filling.  Little did I know that the difference between a 7 inch springform pan and a 9 inch is actually quite significant.  I filled up 6 cupcake molds, a tiny breadpan, and the bottom of a big bread pan because my filling didn't all fit in the 7 inch.


I concede that this plain ol' cheesecake was divine when finished off properly.  I like to eat my cheesecake frozen and topped with something sweet.  The above picture is how it turned out.  I think next time I'll try some type of layered recipe with chocolate and peanut butter.

mmmmm

-Becca

Monday, February 14, 2011

a love note

Friday, February 11, 2011

A Handmade-Book Drive

Remember this handmade toddler book?


This sturdy, easy-to-make, easy to-wipe-clean, children's storybook is simple to customize and SO fun to make!

Well, I am very excited to announce a little project I've got coming.

But first let me backtrack a little to explain:

Have you seen Sarah Hanson's Dolly Donations blog?
She posts news on handmade dolly drives collected for kids all over the world.
I stumbled across her blog months ago and I was just enamored by all the work and love she put into this service.
Now, if you know anything about how I grew up or what I did in college,
you will see why I am always trying to find ways to reach out when I can to children in other countries.
When I saw Sarah's blog, I knew that I immediately wanted to help, but the problem is...
I don't make dolls, I write stories! (Sewing dolls is my sister, Becka's, job).

That's why my discovery of Katie's darling, handmade toddler book pattern seemed like a super treat for me!  I figured, "maybe I can contribute to the dolly drives by making handmade books for the kids!"

Whew!  Now that's a lot of background to explain for this project.
I have since done some research and had a number of discussions with Stephanie, the director at Abundant Ground.

We have talked about designing a few illustrations that inspire joy and hope for some children in Haiti.  We will compile these illustrations in small, 5x5 toddler books (made like the ones on Katie's blog) and wrap them up as gifts for the children, ages 2-6, at the Croix de Bouquets orphanage.  
I am so excited about this project and I kind of have a hard time working on anything else.

Here is my first, finished illustration.  The words read, "souri eklere jou m" which means "smiles brighten up my day."  


Here is another illustration I would like to use, straight off of Sarah Hanson's blog:

(This is a beautiful, sewn wall hanging she made for the children at the orphanage!)

I am sure that the project will evolve as we move forward and the illustrations will change over time.  I already see ways in which I can make the "smiles" drawing better.  But I am so happy to finally get started on this idea that I've considered for months.

We would love to have you follow along and even print the illustrations to make your own copy of the book for your children or even a child in Haiti.

We'll have more info and tutorials to follow! 
Please stay tuned!

-CK


Thursday, February 10, 2011

"Green" Puppet Stage

Some day I envision Becka and I crafting inside a large garage/art studio with the door wide open so we can feel the sunlight and summer breeze while we work.  Becka will be standing at the scroll saw, carving out beautiful, ornate wooden puppet stages.  I'll be designing digitally illustrated backdrops and puppets to go along with each stage & storyline.  The finished puppet stages will be treasured in homes all over the world.  They'll be pulled out to share around the fire place where friends will gather to tell old legends or made-up, imaginative tales with their kids.
... some day...
*sigh*  haha ;)

Well, until we get that dream up-and-running, we'd like to present to you a small, printable DIY puppet stage pattern for you and your family to assemble at home!

The puppet stage is "green" because it up-cycles a large, empty kleenex box.


The only other things you need for this project are some scissors, glue, cardstock and popsicle sticks.


After making this puppet stage with my kids, we had a ton of fun acting out the puppet show script for Daddy before bedtime.  


Because the script is full of ad-lib blank spaces, we can reenact the story over and over giving it a different twist each time.


So, feel free to print and assemble your own "green" puppet stage!
We hope you like it!


-CK

This puppet stage was recently featured on I Still Love You by Melissa Esplin

Monday, February 7, 2011

CAN-O-LA Granola!

Cool blogging friend, Jen, made this AWESOME label to go along with my granola recipe.
She played off the word "canola" and made labels for granola in a can ;)


I made some this morning for breakfast but changed the recipe again...  *sigh*  I never make the same thing the same way twice.  This time I added pecans and sliced almonds, ground flax seed andI used olive oil for canola oil.  But it turned out DELISH, just the same.  If you haven't tried out this recipe before, you really ought to give it a shot.  The kids love it.


"More, please!"


-CK

Friday, February 4, 2011

Ruins


A couple years ago I started this polymer clay miniature.  I had high dreams for it.  A small castle scene that fits in the palm of your hand!  Just imagine how helpful that would be at story time.  When bedtime comes you take down the coveted castle from it's high-out-of-reach place and sit down by your child's bedside.  For a few minutes they get to hold it and dream as you tell your stories.  The stories of high adventure and fairy tales.  Then, after the prop has safely been put away, the child falls asleep to dreams full of magical wonder.

Okay, it didn't happen.

I still think it would be awesome, but there just never seems to be enough time.  It's been in the process of construction for a few years now and it's already falling apart.  The poor wishing well lost it's top.

Oh well,
Life happens.  Who knows, maybe I'll get excited about it again and finish it.

-Becka


Wednesday, February 2, 2011

Wordless Wednesday: A Child's Mural

P.S.  I would just like you all to note that the third child in the picture decided that she was eating a banana and orange.  
Gotta love kids ;)

-CK

Tuesday, February 1, 2011

safe(r) crayons


With a new one crawling I've been increasingly aware of choking hazards.  Some of these choking hazards were the little pieces of broken crayons that roll off the table from an older sister.  To take care of this I decided to make the crayons as chunky as possible.  There are a lot of nice detailed tutorials out there that show you how to make really cute nice crayons.  I just melted mine into a muffin tin.


I ripped off the paper (way harder than it looks, I ended up using a sharp knife), then broke them into small pieces (super satisfying).  After they were divided up into the different tins I put them into the oven at about 425 degrees for maybe 15 minutes.  They melt fast!  They get really bubbly too.

Watch them!  You don't want burning wax.


When cooled, I popped them out.  The tops weren't too cute (a little muddy), the bottoms are a nice playful color though.


And way harder to stuff into a mouth :)

My daughter has discovered that they are stackable.  
It's fun, and they are helping her to learn her colors.

-Becca

LinkWithin

Related Posts with Thumbnails